

Day 1: Children’s Crafts: Sequined Ornaments
Day 2: Children’s Crafts: Felt Christmas Trees
Day 3: Children’s Crafts: Jesus Candle
Be forewarned: Making painted glass ornaments is messy and requires some time {and patience}. But it is well worth the effort! This was by far my children’s favorite Christmas Craft and they are so sparkly and beautiful!
Don’t be scared of the ‘glass’ component of this. My very-busy-2 1/2 year old surprised me beyond belief while doing this craft. She could completely do the whole thing by herself and never dropped her ornament, not even one time.
I can’t say the same about her mother.
Items You’ll Need:
– glass ball ornaments (I bought mine at Michael’s)
– paint of your choice (we used matte green & red and glittery green & red)
– paint brushes
– Q-tips
– rubbing alcohol and cotton balls
– string or ribbon
– coat hanger
How to Make Painted Glass Ornaments
First, wash off the outside of your glass ornaments with rubbing alcohol using cotton balls. The label on the glittery paint suggested I do that and I am so glad I took the extra few minutes to clean them. They were filthy even thought they were packaged! They dry in seconds, so make sure you take the time to do this step.

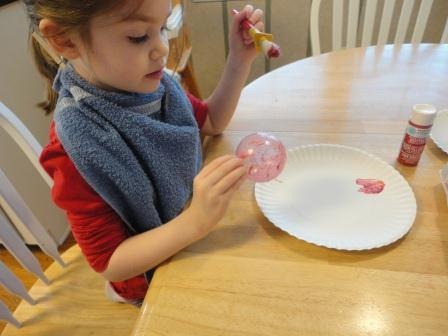
After pouring a (very) small amount of paint in a paper plate, load your brush with an ample amount of paint. While holding the ornament by the hanger (upside down), completely cover the ball with a base coat of paint.

Each of our ornaments needed a second coat, so we let them dry an hour in between coats. Regardless of the paint that was used – matte or glittery – both types needed a second coat.
I racked my brain trying to decide how we could dry them without laying them on a hard surface. I thought up this idea where I hung them with string on an old coat hanger. It worked well!

After applying the second coat, re-fill the paper plates with other types of paint. Dip a Q-tip into the paint and then let your imagination fly.


My kiddos wanted to create little polka dots and stripes. You can certainly create anything your mind can imagine!
Finally, hang them back up and let them dry at least overnight. They need 24-48 hours to cure and not have that tacky feel.

Use these painted glass ornaments to hang on the tree or to tie in the ribbon of a gift for your favorite person.
Follow along in 5 Days of Christmas! There’s a plethora of Christmas-y reading, so stop by the other blogs:
A Slob Comes Clean – Getting Your Home Company Ready
Feels Like Home – Christmas Traditions
Somewhat Crunchy – Christmas with Dairy Allergies
Spell Outloud – Children’s Books
Many Little Blessings – Edible Gifts
Sunflower Schoolhouse – Decorations
An Oregon Cottage – Christmas Cookies
Catholic Icing – Wishing Jesus Happy Birthday
The Traveling Praters – Traveling
The Homeschool Classroom – Gifts Kids Can Make
Mama’s Laundry Talk – Laundry Gifts
Mama’s Learning Corner is your one-stop worksheet spot for the Pre-K to 2nd grade crowd. Don’t miss Mama’s new content that is added several times each week. Subscribe to Mama’s email to get updates in your inbox.


 Children’s Crafts: Jesus Candle
Leave a Reply