
Making homemade ornaments is such a special part of our family’s Christmas traditions, and this Sequined Ornament Craft is a simple, sparkly favorite for preschool through elementary ages. With just a styrofoam ball, sequins, and a handful of pins, your children can create a beautiful, glittery ornament to hang on the tree. This easy Christmas ornament craft is perfect for a quiet morning at home, a co-op group, or a fun holiday activity with your younger learners.
Welcome to 5 Days of Christmas Crafts at Mama’s Learning Corner! Get your craft supplies ready – this is going to be a fun week.
We’re starting out the first day of Christmas Craftiness with Sequined Christams Ornaments. I remember making quite a few Christmas ornaments as a child, but this Sequined Ornament was one of my favorites! I distinctly remember making it in Mission Friends and having a wonderful time pinning each little sequin on.
I hope my children made many great memories making their Sequined Christmas Ornaments too!
🎄Looking for more Christmas Ideas? Browse through my large selection of Christmas Worksheets and Printables! You will find book suggestions, more craft ideas, and a plethora of printable worksheets and activities for your young learners.
This post uses affiliate links. Please read my disclosure policy for more information.
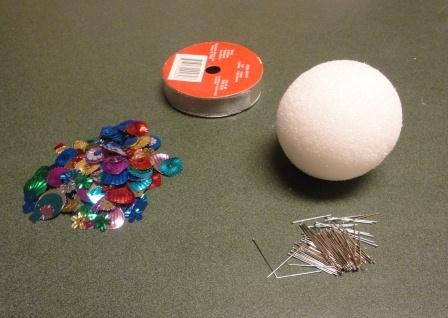
What You Will Need for a Sequined Ornament Craft
The supplies needed for this craft are not ones that I had on hand, however, I was able to find them at Michael’s easily. So head out to your favorite craft store with this list in hand!
Items You will Need for the Sequined Ornament Craft:
– Styrofoam balls: 3” or 4” in diameter
– Mixed Sequins: a variety of fun shapes and sizes; make sure they have a hole in them for the pin
– Christmas Ribbon 1/2” or 3/4” in width is best
– Straight pins with a flat head
How to Make a Sequined Ornament Craft for Christmas
Sequined Christmas Ornaments are perfect for a wide range of ages from Preschool all the way through high school. Versatile Christmas crafts are always in demand, and I have found that to be even more true as my children have gotten older!
I originally thought of this idea for my young children, but it would also be a great fit for a middle school or high school Girls’ Craft Afternoon.
The steps are so easy! Follow along with me below.
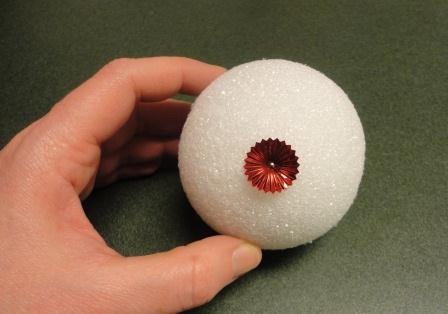
- Prepare your materials.
Choose a 3″–4″ styrofoam ball and select a variety of colorful sequins. - Pin the sequins.
Slide a straight pin through the hole of each sequin and press it firmly into the styrofoam ball until the pinhead is flush.

3. Create patterns or layers.
Your child can place sequins in rows, create simple patterns, or layer them for extra sparkle.
Create as many designs as your imagination can dream up!
4. Cover the ornament completely.
Continue pinning until the entire ball is full and glittery and as sparkly as possible. These ornaments reflect Christmas tree lights beautifully!
5. Add a ribbon hanger.
Cut a 6-inch length of festive Christmas ribbon, fold the ends together, and secure them to the top of the ornament with a pin.
6. Display and enjoy!
Hang your handmade ornament on the tree for a lovely homemade touch.

Your children will love to see their ornaments hanging on the tree! Enjoy!
Notes and Tips for Making Sequined Christmas Ornaments
Here are a few helpful ideas as you think about making your own homemade ornaments with your children or group.
Younger children may need help with the pins.
Preschoolers and early elementary students often need help pressing the pins firmly into the styrofoam ball. A small thimble or the eraser end of a pencil can make pushing pins much easier.
Choose sequins with a mix of sizes and shapes.
Larger sequins cover the ball more quickly, while smaller ones fill in gaps and add extra sparkle.
Use ribbon that coordinates with your Christmas décor.
Traditional red, green, and gold look beautiful, but bright colors are fun for younger learners. Grosgrain ribbon (my favorite!) works especially well because it holds its shape.
Keep supplies from rolling off the table.
A small tray, sheet pan with a lip, or shallow box lid helps keep sequins and pins from rolling onto the floor.
Great for group settings.
This craft works wonderfully for co-op days, church groups, Sunday School, or a fun activity with the cousins at Christmas gatherings.
Makes a lovely keepsake.
Don’t forget to write your child’s name and the year on the bottom of the ornament with a fine-tip Sharpie so you can remember when it was created.
You can also write it with a fine-tipped Sharpie on the inside of the ribbon.
Edited to add in 2025: At the time of this original writing, my children were 6, 4, 2, and a baby, so we only made three ornaments that year! Now my children are 20, 18, 16, 15, and 8. They unwrap their homemade ornaments every year and we reminisce with joy! Take the time to do small things with them, Mamas. You won’t regret it in later years. ❤️
More Christmas Craft Ideas for Children
This post was part of a 5 day series of Christmas Crafts for Children that I published 10+ years ago. Find the other ones here:
🎄Easy Felt Christmas Tree Craft for Kids
🎄Jesus Candle Craft: “Light of the World” Christmas Activity
🎄Easy Painted Glass Ornament Craft for Kids
🎄Easy Cotton Ball Candy Cane Craft for Kids


Leave a Reply